Category Archives: Salmon & seafood

Coconut Fish Pie

Louise Yang and Jeremy Hendon blog at Ancestral Chef, and I had the pleasure of talking with them at PaleoFX. They share a lot in common with Shou-Ching and I; you can read about Louise’s eclectic background here. Like us, they combine busy professional lives with a love of food, and try to create simple and easy to prepare but delicious meals drawing upon all the world’s cuisines. Louise has also defended the honor of the potato, which endears her to us. Louise has kindly agreed to share one of her favorite recipes. Here’s Louise!

achef cfp 1

Growing up in England, I was destined to love pies. 

For those of you who haven’t visited England or Australia, when I say “pies,” I don’t mean the typical American dessert pie (although I have to admit a fondness for gooey apple pies); I mean the savory pies filled with delicious meats and with sauces oozing out from their starchy coverings.

From steak and kidney pies, to cottage pies, to shepherd’s pies – there’s pretty much a pie for every food you can imagine!

Well, I didn’t want being Paleo/PHD to distract me from my obvious pie-eating destiny, and so the coconut fish pie was born.

Note: The full ingredients list and instructions are at the end.

Preparing Coconut Fish Pie

Start by boiling 3 or 4 sweet potatoes (or potatoes) until they’re tender (check by pushing a fork into them).  You can speed up the process by peeling and chopping the sweet potatoes (or potatoes) and then boiling them. 

achef cfp 2

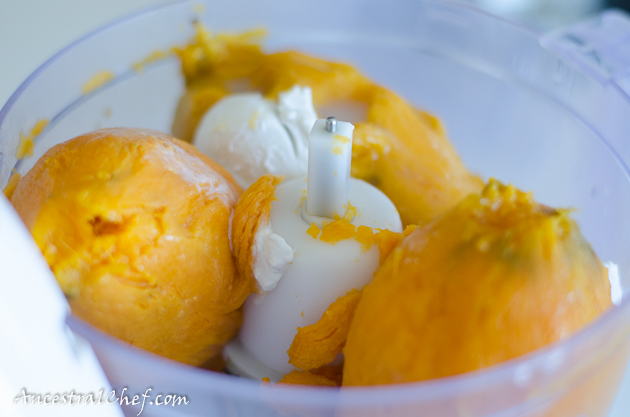
Blend the peeled sweet potatoes (or potatoes) in your food processor with 2 tablespoons coconut oil and 1/4 cup coconut milk until it turns into a nice mash.  Put the mash aside while you make the rest of the pie.

Boil 3 eggs, and preheat the oven to 350F (175C).

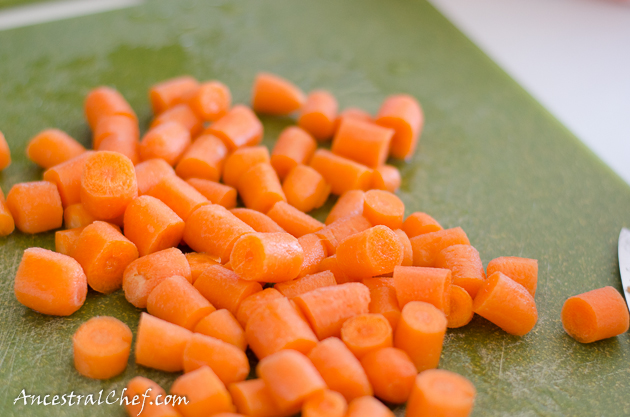
Chop up 1 cup of carrots.

achef cfp 2b

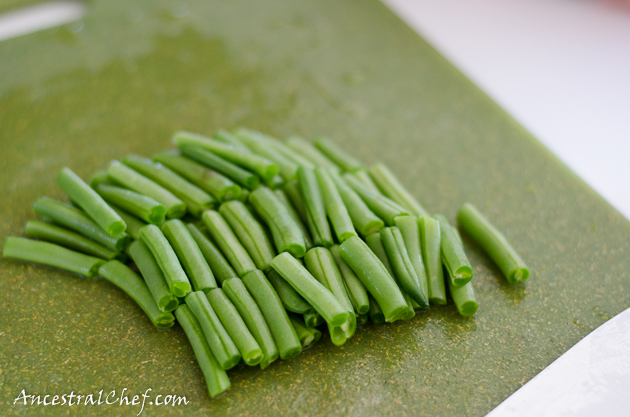
Chop up ½ cup of green beans.

achef cfp 2c

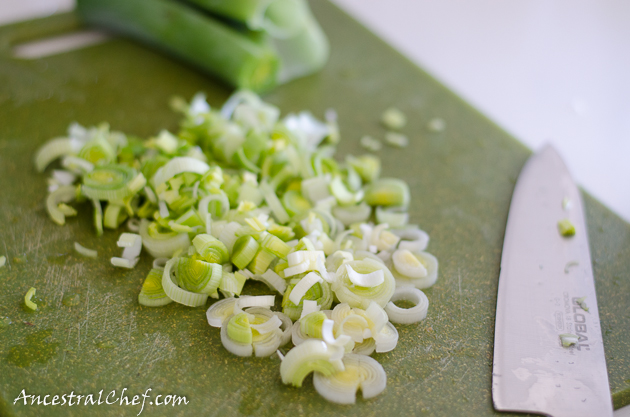
And chop up 1 leek (approx. 1 cup).

achef cfp 2d

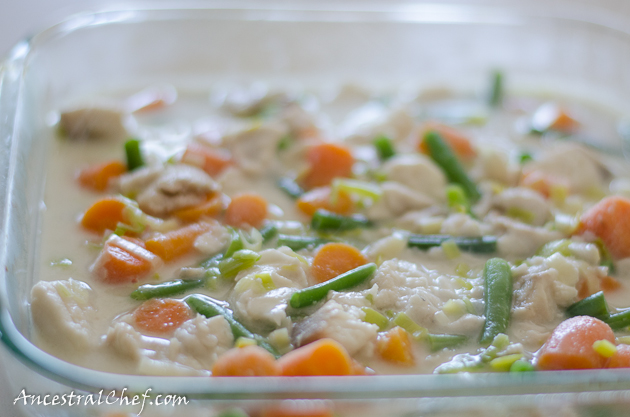
Pour the rest of the 1 can (13.5oz or 400ml) of coconut milk (i.e., what you didn’t use for the mash) into a saucepan and heat on medium heat.  Add in the chopped vegetables.

achef cfp 3

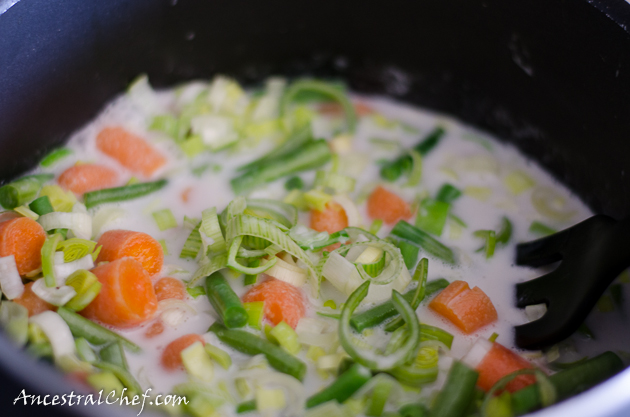
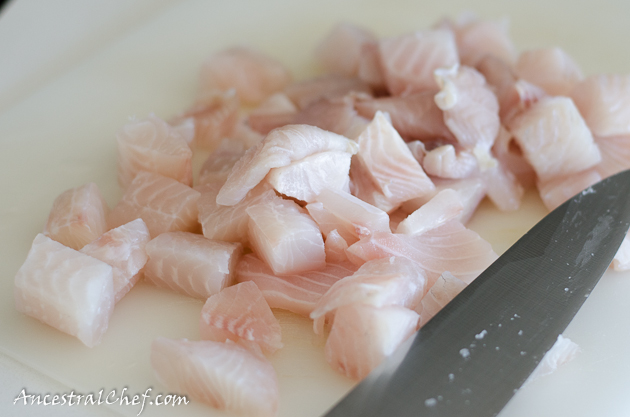
While the vegetables are cooking, cut approx. 1.5 lbs of white fish (I used tilapia) into 1-inch cubes/chunks (you can also substitute some prawns or scallops for the fish).

achef cfp 4

Place the fish into the saucepan as well.

achef cfp 5

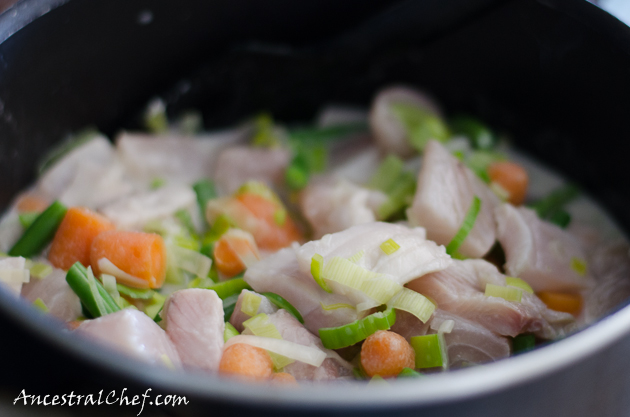
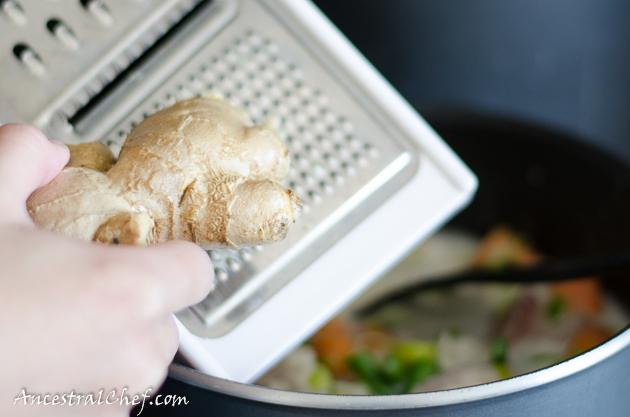
Grate 2 teaspoons of fresh ginger into the pot (tip: store ginger in the freezer and grate some into your dishes when needed).  Add salt and pepper to taste.

achef cfp 5b

Cook for 5 more minutes on medium heat and then pour into an 8 by 8 pyrex oven dish or else into several small ramekins or miniature casserole dishes (4-8 depending on how large the ramekins are).

achef cfp 6

achef cfp 6b

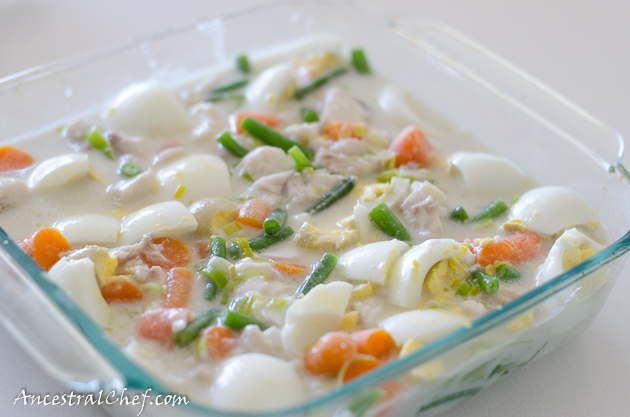
Peel the hard boiled eggs, and cut them into small pieces and place them into the dish as well.

achef cfp 6c

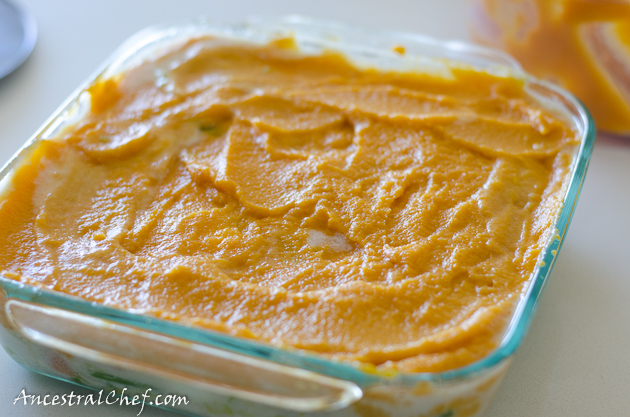
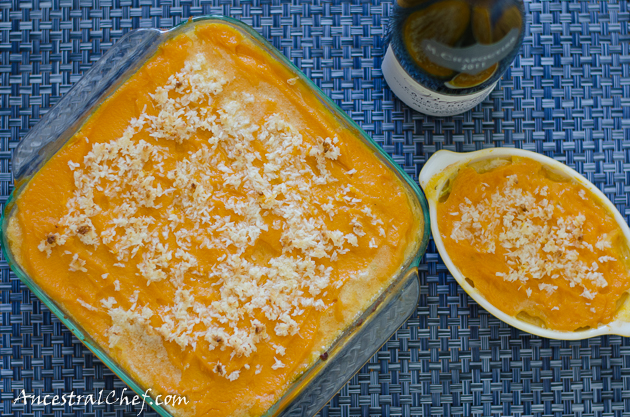
Gently spread the sweet potato (or potato) mash over the top of the fish mixture so that the entire mixture is covered (it doesn’t need to be a thick layer).  If the fish mixture has too much liquid, then spoon some of the liquid out.

achef cfp 7

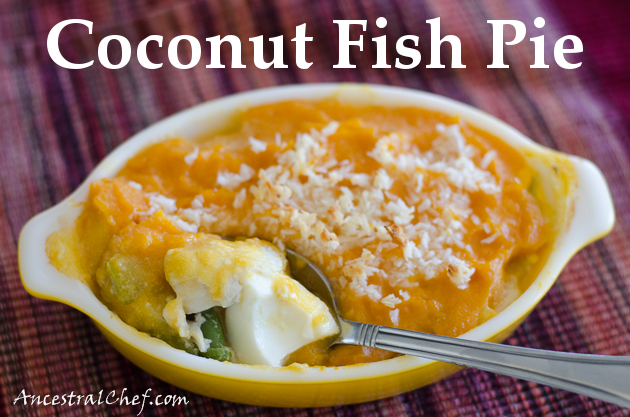
As an optional topping to make the pie just a bit prettier, mix 4 tablespoons of coconut flakes with 2 tablespoons of melted butter (omit this if you’re dairy-free).

achef cfp 8

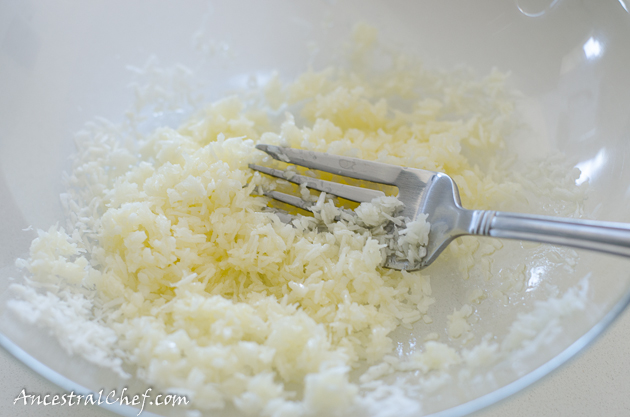
Gently sprinkle the coconut flakes mixture over the top of the mash.

achef cfp 9

Bake in the oven for 20 minutes (you’ll see the sauce boiling and the coconut flakes will get a bit toasted).  Leave to cool for a few minutes and serve!

achef cfp 9b

Fish Pie Recipe

Makes 4-6 servings  Preparation Time: 40 minutes  Cooking Time: 20 minutes

Ingredients:

Topping:

  • 3-4 medium sized sweet potatoes (or potatoes)
  • 2 tablespoons coconut oil
  • 1/4 cup coconut milk (leave the rest of can of coconut milk for the fish mixture).
  • 1/4 cup coconut flakes and 2 tablespoons melted butter (optional topping)

Fish Mixture:

  • 1.5 lb white fish (or prawns or scallops), cut into small 1-inch chunks
  • Rest of 1 can (13.5 oz or 400ml) coconut milk
  • 1 cup carrots, chopped
  • ½ cup green beans, chopped
  • 1 leek (1 cup), chopped
  • 2 teaspoons fresh ginger, grated
  • Salt and pepper to taste
  • 3 hard boiled eggs, chopped

Instructions:

  1. Boil the sweet potatoes (or potatoes) until they are soft (you can peel and chop them up if you want them to cook faster).  Food process with 2 tablespoons of coconut oil and ¼ cup of coconut milk.
  2. Hard boil 3 eggs.
  3. Pre-heat oven to 350F.
  4. Heat the rest of the can of coconut milk in a saucepan on medium heat.  When it starts boiling, add the chopped carrots, leek, and green beans.
  5. Cut up the fish into 1-inch cubes/chunks and add to the saucepan.
  6. Grate some fresh ginger into the saucepan and season with salt and pepper to taste.  Cook for 5 more minutes.
  7. Spoon the fish mixture into an 8 by 8 inch pyrex oven dish or into individual ramekins (4-8 depending on ramekin size).
  8. Peel and chop up the hard boiled eggs and drop them into the fish mixture.
  9. Spread the mash over the top of the fish mixture.
  10. For the optional topping, melt 2 tablespoons of butter and mix in 1/4 cup of coconut flakes.  Sprinkle the coconut flakes mixture over the top of the sweet potato mash.
  11. Place in oven for approx. 20-25 minutes.  Make sure after 20 minutes that the coconut flakes are not turning too brown.


Okonomiyaki (Japanese pizza-style pancake)

KH left a note on the Recipes page about Okonomiyaki, a Japanese pancake. Our 17-year old niece Seo Yi, who is visiting from Korea, said, “I know how to make that!” We decided to give it a try.

In Asia, pancakes are eaten as we eat pizza or omelettes – as an all-purpose meal that can have an assortment of ingredients. Feel free to substitute ingredients at will; but this assortment worked very well for us.

Ingredients

The only unusual ingredient you need is yamaimo, the Japanese mountain yam. Yamaimo is also called nagaimo (or two words, yama imo or naga imo); or, can be called Chinese yam or Korean yam or even “slimy potato.” When grated, yamaimo releases a sticky liquid that helps the pancake stick together.

The ingredients may be divided into three groups. The first group makes a batter. We recommend:

  • 100 g (2/3 cup) gluten free flour
  • 1 tsp baking powder
  • 100 ml (1/3 cup) bone broth
  • 2 eggs
  • Yamaimo (Japanese mountain yam)

The second group provides the vegetables and meats or seafood that make it a meal. We recommend:

  • cabbage (2-3 leaves)
  • green onion (2-3 stems) or onion (1 medium)
  • shrimp (5 large)
  • scallops (6 medium)
  • shiitake mushrooms (6)
  • sweet pickled ginger (optional)
  • salt and pepper

Finally an assortment of toppings are added either during cooking or after cooking is done. We recommend:

  • bacon (added during cooking)
  • sour cream (added after cooking)

Other sauces — okonomiyaki (Chuno) sauce, spicy (Sriracha) sauce – and toppings (eg, dulse or bonito flakes) may be added to your taste. We wouldn’t go out of our way to pick up the Japanese sauces; but we consider the extra fat from the bacon and sour cream to be important, as the brings the macronutrient proportions in line with PHD recommendations and improve the taste.

We made several batches with slightly different sets of ingredients. Here are a few pictures of non-meat ingredients:

Cabbage leaves, eggs, green onion, gluten-free flour, yamaimo section, sweet pickled ginger..

Cabbage leaves, eggs, grated mozzarella cheese (as we mentioned, you can add almost any ingredient), yamaimo, gluten-free flour, baking powder, onion, shiitake mushroom.

And here are the meats we favor – bacon, scallops, and shrimp:

Preparation

Mix the gluten-free flour, baking powder, bone broth, and eggs in a mixing bowl. Peel the Yamaimo and grate it directly over the mixing bowl, releasing its sticky fluid into the batter. Mix well.

Cut the vegetable and meat ingredients into small pieces and mix into the batter. It will start to look like this:

These ingredient amounts will make enough batter for one very large pancake (filling a wok or griddle) or two smaller pancakes.

Warm a wok or griddle at medium heat and add a tablespoon of butter to grease the pan. Pour in the batter and reduce the heat to medium-low.

A large pancake will require ten minutes per side at medium-low heat, smaller pancakes will require about five minutes per side. While the first side is cooking, lay bacon over the top of the pancake and add some batter over the top to help seal the bacon in:

When the first side is sufficiently cooked, flip the pancake and cook the other side. Here is a smaller size pancake – note that it doesn’t fill the pan:

When finished, the large pancake looks like this:

Here is a smaller pancake on a serving plate:

Cut the pancake into slices like a pizza and serve with sour cream:

Or with sour cream and okonomiyaki sauce:

Variations

Any number of meats, toppings, and sauces can be added. Some cooks add potato chips to give the pancake a crunchy texture; we tried this once and it didn’t improve the taste, so we don’t recommend including potato chips.

Here is one variation — so easy a dog can do it! Watch how the Yamaimo releases its sticky fluid when grated:

Conclusion

Okonomiyaki is delicious, is an Asian street standard, and yet most Americans have never tried it. Asians love pancakes, and you’ll know why after trying this!

Garlic Shrimp

When we want a dinner that’s easy and fast to cook, we often turn to shrimp. Here’s a typical shrimp dinner.

We’ve been cooking a lot with ceramic stoneware as it is easy to clean and won’t release any toxins into food. We start by warming the pot under medium heat and adding 2/3 stick butter, 3-4 crushed garlic cloves, and salt and pepper:

The shrimp should be thawed, cleaned and patted dry. Although it’s not necessary, we coated them in a homemade gluten-free flour (rice flour, potato starch, and tapioca starch).

As with our Pan-Seared Scallops, we recommend adding them individually to the pan so that you can keep the butter hot and sear the shrimp’s surface.

It doesn’t take long to sear the surface – about 1 minute per side on medium heat. Here we’ve flipped three of the shrimp:

The advantage of searing and brief cooking is that the shrimp will retain water and be plump and juicy. Overcooking makes them dry and tough. As with most meats, for health purposes it is enough to cook the surface, where the germs are.

Continue multiple rounds of cooking until all the shrimp are done. When you’re done with the shrimp, there will be oil and garlic in the pan which you can use to cook a vegetable. Here’s our pan:

To which we added spinach:

The spinach loses a lot of volume as it cooks. Soon after adding the spinach, you can turn the heat off or down very low because the ceramic pot retains heat for some time.

Here is how the spinach and shrimp look when served:

Add in boiled potatoes with butter or sour cream, and you’ve got an easy and nourishing PHD meal!

Pan-Seared Scallops

Scallops are probably our favorite seafood. Living in Boston, we’re fortunate to have access to fresh scallops at reasonable prices most of the year.

One nice aspect of scallops is that they can be cooked very quickly. In fact, they do not need cooking at all – they can be eaten raw – but it is generally a good precaution to cook the surface, where bacteria are most likely to be present. Thus, seared scallops.

We make them two ways, with and without a flour coating, for a slightly different taste.

Classic Seared Scallops

The main trick to cooking scallops is preventing water from escaping the flesh. With loss of water, scallops become smaller and tougher and much less pleasant to eat.

The classic way to keep the water in is to sear the scallops at high heat. To achieve this, the surface of the scallops must be dry. (If the surface is wet, the water with its high heat capacity will prevent the surface from reaching high temperatures before the interior of the scallop has warmed enough to release its water.)

So pat your scallops thoroughly dry with paper towels, then season them with salt and pepper:

Warm the pan to high temperatures, and add oil; we prefer ghee (clarified butter) or beef tallow. Olive oil can also work. If you use butter, which has water, then you should heat the butter long enough that its water evaporates before adding scallops.

When the hot oiled pan is ready, place the scallops in the pan with space between each.

The reason for spacing the scallops is to maintain a high temperature at the scallop surface. If the scallops are too close together, they will cool the pan and prevent the surface from being properly seared.

The above pictures shows a minimal amount of oil. You can use more oil – as much as 3-4 tablespoons – which will cook the scallops faster.

The ideal pan temperature is the lowest temperature at which water doesn’t accumulate in the pan. Water released from the scallops should immediately turn to steam, so you see no liquid water, but this evaporation will prevent the scallops from burning. With a little practice you’ll find the right temperature; on our gas stove it is a medium-high heat.

It typically takes about a minute and a half to sear one side of the scallop. After 90 seconds, flip the scallop over and sear the other side for 90 seconds. You can also turn them on their side briefly to sear the sides.

Remove them from the pan and serve:

Crispy Seared Scallops

For a slightly different flavor, lightly coat the scallops in a safe starch flour (rice flour, potato starch, tapioca starch, or mixture) as well as salt and pepper.

You can add sliced garlic or other flavoring vegetables to the oil to alter the flavor; the flour coating will pick up flavors from the oil.

Typically the flour-coated scallops will retain water better and the flour will burn more easily, so they should be cooked at a lower temperature for a bit longer – say 2 minutes per side at a medium setting on our stove.

Dipping Sauce

Once they are done, remove and make a dipping sauce. The recipe for PHD sauces is:

  • Oil – such as olive oil.
  • Acid – such as rice vinegar, lemon juice, or lime juice.
  • Flavorings – such as mustard, salt, pepper, or herbs.

Here we made a sauce from olive oil, rice vinegar, mustard, salt, pepper, and cilantro, and drizzled it over the scallops:

Conclusion

Because they are barely cooked, almost raw inside, time from refrigerator to dining table can be as little as 10 to 15 minutes. Serve with a safe starch and vegetable, and you have a complete meal.

Here are a few other perspectives on scallops. Here is Ming Tsai, a chef from suburban Boston:

And here’s Chef John from FoodWishes.com. His sauce is the same as ours, but with jalapeno and orange slices added: